|
How to create a FORM in
DreamWeaver that will send info to |
|
Creating Forms in
Dreamweaver Forms allow users to interact with a Web page. They can be used to create surveys, collect information from users, or for many other purposes. Macromedia Dreamweaver MX 2004 makes it easy to add forms and form objects to your pages. This page will help you create a simple form in Dreamweaver and send the results to your email address. Inserting the
Form Field This inserts a form field. Everything within the dotted lines is part of the form.
Inserting Form
Objects 2. Make sure the
field is selected and the Properties window appears at the bottom
of the screen since this is where the options will be selected. Click the
arrow icon to open the Properties window.
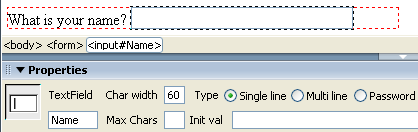
3. Where it says textfield, type in the name of the field. After Char Width, enter the width of the field. After Max Chars, enter the maximum amount of characters you want the user to be able to enter. After Type, make sure Single Line is selected. After Init Val, enter the initial value that will be shown in the field.
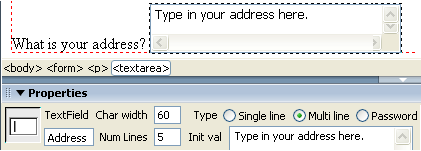
A Multi Line Text
Field: 2. Type "What is your address?" followed by a space. From the Insert menu, choose Form and then Text Field. 3. In the Property Inspector, after Type, select Multi line. Enter a name, Char Width and Init Val. After Num Lines, enter the height you'd like the text field to be. After Wrap, choose an option. These will change how text wraps within the box.
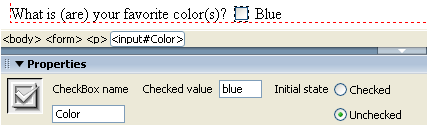
A Checkbox: 2. After the box, type in the name of a color. 3. In the Property Inspector, enter a unique name for the box. After Checked Value, enter the name of the color that that box will select. After Initial State, select Checked if the box will be initially checked or Unchecked if the box will be initially unchecked (usually preferred).
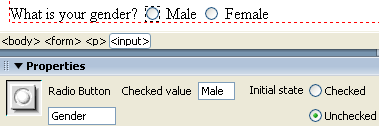
4. Repeat adding the boxes, typing in color names and modifying the box properties until you are satisfied with the number of selectable colors. Keep the checkbox name "Color" the same on each of the colors' check boxes. A Radio Button: 2. Right after the button, type "Male." Type another space, insert another button, another space and type "Female" right after it. 3. In the Property Inspector, enter a unique name and Initial State for the button. After Checked Value, enter the gender the button will specify.
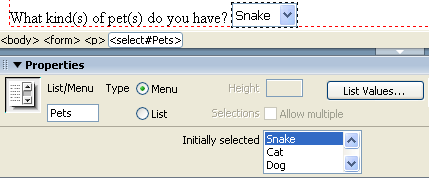
4. Modify the properties for the other button. Remember to make the unique name the same. A Drop-Down Menu: 2. Click the List Values button in the upper-right hand corner of the Property Inspector. The List Values dialog box comes up. In the Item Label column, specify names for the pets. In the Value column, specify their names again. Click the Add symbol to add more pets. When you are satisfied with the number of selectable pets, click OK to return to the Property Inspector. 3. Enter a name for the menu. After Type, choose Menu. After Height, enter a value for the height of the visible menu. After Selections, make sure the Allow multiple box is checked. After Initially Selected choose entries that you would like to be selected at default.
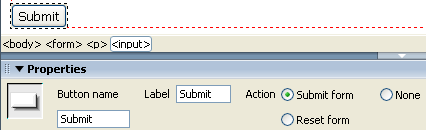
A Button: 2. Enter a name for the button in the Property Inspector. After Label, enter the text that will appear on the button. After Action, make sure Submit form is selected.
3. If you want to, you can insert another button now. This time, make sure the Action is Reset form and it will allow the user to reset all the selections they made to the defaults. Modifying Form
Properties 1. Click on the outline of the form and notice the change in the Properties window . 2. Enter a name for the form. After Action, enter "mailto:your email address." After Method, make sure POST is selected. If you stop now and someone returns the form to you filled out, it will come back as a document that is very hard to read. To get it in plain text, make the following change. After Enctype, type in "text/plain".
|