 By Vitaly Bekker ~ student KCSS future digital master mind |
|
By Vitaly Bekker ~ student KCSS future digital master mind |
| Scan Lines This tutorial will demonstrate how to make those nifty scan lines used on many banners and other graphic designs without much time or effort. First, create a new image. The dimensions of the image depend on how you want your lines to look. If you want the lines to have little space between each other, make the height of the image three pixels or less. Anything over three pixels or more w 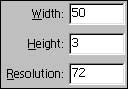 ill make your lines very
far apart. The width of the image doesn't matter, but you should
use something in the range of 75-25 pixels. The background of the
image depends on what the background of your graphic, so if your
graphic has a black background, make the background of this image
black as well. Leave the rest as it is and click "OK". ill make your lines very
far apart. The width of the image doesn't matter, but you should
use something in the range of 75-25 pixels. The background of the
image depends on what the background of your graphic, so if your
graphic has a black background, make the background of this image
black as well. Leave the rest as it is and click "OK". Select the line tool from the "Tools" menu. If you are using Photoshop  Elements, the line tool is located under the Shapes (e.g. Rectangle Tool, Custom Shapes Tool). If you are using any other PhotoShop, the line tool should be where the pencil tool is. Draw a line from left to right or right to left through the middle of the image.  Select
the whole image. To do this, click the layer you drew the line in,
and press "Ctrl + A". While the image is selected, go to "Edit >
Define Pattern" on the toolbar. Name the pattern whatever you want
and press "OK". Your pattern is now saved in PhotoShop. You can
close your current image, or you can keep it open if you think you
will be editing it later. Select
the whole image. To do this, click the layer you drew the line in,
and press "Ctrl + A". While the image is selected, go to "Edit >
Define Pattern" on the toolbar. Name the pattern whatever you want
and press "OK". Your pattern is now saved in PhotoShop. You can
close your current image, or you can keep it open if you think you
will be editing it later.  Now, open the image you want to use the scan lines effect on, or create a new one. I used this image of Ali G, but you should use an image that fits the background you chose for your line pattern. 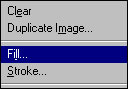 Once
you are ready, create a new layer ether from the layers window or
go to "Layer > New > Layer" from the toolbar. After creating the
new layer, select it and go to "Edit > Fill" on the toolbar. When
the "Fill" window pops up, select "Pattern" in the contents drop
down. Choose the custom pattern button and find the line pattern
you created, which should be the last one there. Select it, leave
everything else the way it is, and click "OK". Once
you are ready, create a new layer ether from the layers window or
go to "Layer > New > Layer" from the toolbar. After creating the
new layer, select it and go to "Edit > Fill" on the toolbar. When
the "Fill" window pops up, select "Pattern" in the contents drop
down. Choose the custom pattern button and find the line pattern
you created, which should be the last one there. Select it, leave
everything else the way it is, and click "OK". 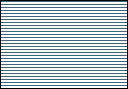 Your
image should now be completely filled with your scan line pattern.
If you are wondering why it covered everything up, it's suppose to
do that, and we will make it look good in the next step. Your
image should now be completely filled with your scan line pattern.
If you are wondering why it covered everything up, it's suppose to
do that, and we will make it look good in the next step. 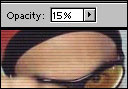 Select
the layer with your pattern. Above the layer, is the "Opacity"
option, which makes your image see through. I set my opacity to
15%, but you can try different numbers. If you are looking for
better effects, try to experiment with the blending modes, which
are on the left of the Opacity option. Select
the layer with your pattern. Above the layer, is the "Opacity"
option, which makes your image see through. I set my opacity to
15%, but you can try different numbers. If you are looking for
better effects, try to experiment with the blending modes, which
are on the left of the Opacity option.  You now have your scan lines. The blending modes are very helpful for better looks. If done properly, you can get something like on the right, which is a small piece of the banner at the top of this page. |