|
|
|||
|
Inserting Sound with
Dreamweaver
This page provides instructions for inserting sound clips into a Macromedia Dreamweaver MX 2004 Web page. Sound clips should only be used to enhance your Web page, so avoid using sounds that distract Web users from your site's purpose. Never use sound as the only way to communicate. Not all browsers, platforms or computers support sound, and not all users will be able to experience the sounds you include. To record your own sound, see the page on Capturing Audio with Sound Recorder. If you haven't created your own original sound files, be sure to read the Guidelines for Sound File Use and then see our page on finding soundson the Web. If you need a sound clip to follow along with this tutorial, download the three below, all of which are very small files that will load quickly. Right-click on a link below (Mac users hold the Control key and click) and select "Save Target As." Browse to an appropriate folder on your computer or network and then save the file. Creating a Link
to a Sound File 1. Save a sound file into the same folder as your Web page. 2. Open up a new or existing Web page in Macromedia Dreamweaver MX 2004. 3. Save the page into your Web site's folder with an appropriate file name (music.html for example). 4. Type in some text to serve as the link. 5. Highlight the text. In the Link field of the Properties window at the bottom of the page, type in the path to the file (such as drums.mid).
If your Web site has more than one folder, simply typing in the name of the file may not point to the correct folder. Instead, double-click (Mac users hold the Control key and click) on the folder icon to the right of the Link field. Browse to and select the file, and then click OK. You
will need to upload both the sound file and the Web page to a Web server.
Inserting a Sound
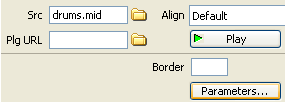
File 1. Open up a new or existing Web page in Macromedia Dreamweaver MX 2004. 2. Save the page into your Web site's folder with an appropriate file name (music.html for example). 3. From the Insert menu, select Media and then Plugin. 4. Browse to and select the sound file and click OK. The plugin icon appears on the page.
5. With the plugin icon selected, modify the various options as desired from the Properties window. Click the Parameters button to define further options.
Optional Sound For an example, click on the play icon below to play the "drums.mid" sound file.
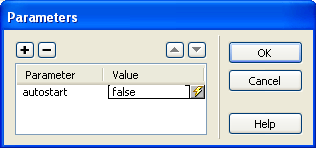
Make the sound clip optional by typing "autostart" into the Parameter column. Type "false" into the Value column and then click OK.
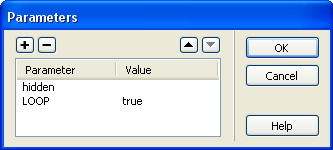
Background Sound Type "hidden" in the Parameter column to hide the sound controls. Click on the + icon to add a new Parameter. Type "LOOP" in the Parameter column and enter "true" in the Value column to make the sound loop. Click OK to set the new Parameters.
You will need to upload both the sound file and the Web page to a Web server. Remember, not all browsers, platforms or computers support sound, and not all users will be able to experience the sounds you include. |